Try out Isso, a self-hosted blog comment system for web sites, when enabling comments for static websites.
Disqus made quite some bad news over the course of this year. Critism predominantly centers around questionable privacy policies and ridiciulously bad site performance when using the service.
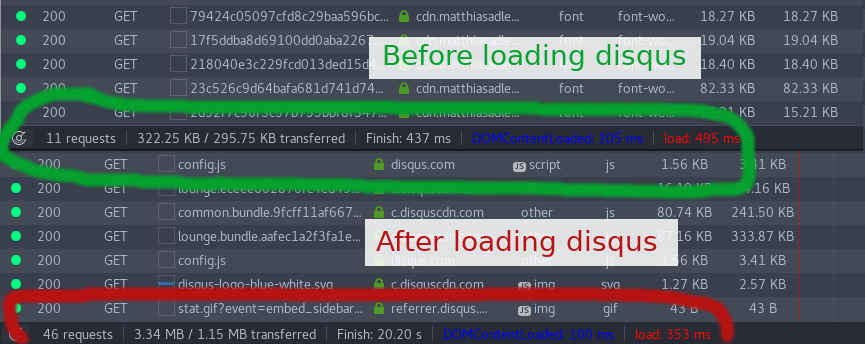
Impact on site performance when disqus is loaded
Some of these issues can be addressed by adding a strict CSP-Policy preventing most tracking codes from being requested in the first place. Only triggering the disqus widget when a visitor actually scrolls far enough down the page to see the comments section also helps.
Either way, it is about time to start looking for alternatives.
One particularly interesting approach is (mis-)using the github.com issue tracker. There is even a service called staticman simplifying the process, now.
But, this still means to be relying on external 3rd-party services, and limit the number of potential commentors to users with an github account (which may or may not matter).
I decided to go with Isso, a self-hosted commenting server similar to Disqus.
Self-hosted comments with Isso

Wynaut by @veekun
A detailed walkthrough on how to integrate Isso into a (static) site can be found here: Adding Isso comments to Hugo.
This post is about walking a slightly different path:
- Deploying the Isso backend as a uswgi service (standalone mode)
- Setting up nginx to proxy requests to uwsgi-backend
- Customizing the client-side code and serving it from a different location
If either of this seems like too much work, an alternative strategy would be to simply use Wonderfall’s Isso docker image, which will get you up and running in no time.
Deploy backend
Isso’s backend code is written in Python so we’re going to install the necessary packages first:
# yum -y install epel-release && yum -y install uwsgi-plugin-python3 python34-devel gcc
Depending on what OS / Distribution you’re using, you’ll need to adjust the above command. It’ll work on CentOS/RHEL 7 right away, but providing examples for all possible configurations is outside the scope of this post.
Next, create a new Python virtual environment and install Isso into it:
# python3 -m venv /opt/isso && cd /opt/isso && . bin/activate && pip install isso && mkdir {etc,data}
Installation of Isso fails if neither the compiler gcc nor the Python development files are available.
We’re creating 2 more directories here: etc will hold configuration files, e.g. if you wanted to setup multiple sites. Similarily, data will hold the SQLite database files for each configured site.
A minimal configuration file /opt/isso/etc/isso.conf looks like this:
[general]
dbpath = /opt/isso/data/isso.db
host = https://example.com/
Depending on your needs, have a look at all Isso configuration options.
If you have an XML-export file from disqus, you can import those comments:
# isso -c etc/isso.ini import /path/to/disqus/export/file.xml
Beware of bad export files, though. It looks like disqus exports have invalid id-elements at times. You’ll know, if the output displays a list of comments that read Found x orphans:. If that is the case, try adding the option --empty-id to the importer, or fix the missing ids manually.
uwsgi service
Place the following as a file into the filesystem path /etc/uwsgi.d/isso.ini.
[uwsgi]
plugins = python3
strict = true
socket = 127.0.0.1:1234
master = true
processes = 1
threads = 2
cache2 = name=hash,items=1024,blocksize=32
spooler = /opt/isso/data/spool
module = isso.run
chdir = /opt/isso
virtualenv = /opt/isso
env = ISSO_SETTINGS=/opt/isso/etc/isso.ini
Because we’re not going to run Isso with root privileges, give user uwsgi write access to the database and spool files only:
chown -R uwsgi:uwsgi /opt/isso/data
Manually starting Isso is now possible like so:
uwsgi --uid uwsgi --ini /etc/uwsgi.d/isso.ini
Systemd service file
Register a systemd service which will make it dead-simple to run one, or many different Isso services (or any other uwsgi-app).
Save this file in /etc/systemd/system/[email protected].
[Unit]
Description=uWSGI %i App
After=network-online.target syslog.target

[Service]
KillMode=process
User=uwsgi
Restart=on-abnormal
RuntimeDirectory=uwsgi
PIDFile=/run/uwsgi/%i.pid
ExecStart=/sbin/uwsgi --ini /etc/uwsgi.d/%i.ini
ExecReload=/bin/kill -s HUP $MAINPID
ExecStop=/bin/kill -s TERM $MAINPID
KillSignal=SIGQUIT
Type=notify
StandardError=syslog
NotifyAccess=all

[Install]
WantedBy=multi-user.target
After reloading systemd with systemctl daemon-reload, you can now start Isso comment system with systemctl start uwsgi-app@isso.
Additional config files placed in /etc/uwsgi.d/<your-filename>.ini will be automatically picked up by systemd and made available as uwsgi-app@<your-filename> service.
Setup reverse proxy
In order to make requests to Isso from the outside world, we’re going to use a reverse-proxy.
Nginx has excellent uwsgi-support built in, so let’s just add a new virtual host that handles forwarding requests to our new comment system backend.
server {
  listen 80; # consider using https instead
  server_name YOUR_SERVER_NAME; # replace this with a real domain name
  root /dev/null;

  location = /favicon.ico {
    return 204;
  }

  location = /robots.txt {
    default_type text/plain;
    return 200 'User-agent: *\nDisallow: /\n';
  }

  # only pass through known api endpoints
  location ~* ^/(new|count|id/[0-9]+(/((dis)?like|delete/[a-zA-Z0-9\._]+))?)?$ {
    include uwsgi_params;
    uwsgi_pass 127.0.0.1:1234; # use uwsgi socket from config file
    uwsgi_param Host $host;
    uwsgi_param X-Real-IP $remote_addr;
    uwsgi_param X-Forwarded-For $proxy_add_x_forwarded_for;
    uwsgi_param X-Forwarded-Proto $http_x_forwarded_proto;
  }

  # uncomment if you do *NOT* want to customize client-side, see later section
  #location ~* ^/js/(count|embed).min.js$ {
  #  alias /opt/isso/lib/python3.4/site-packages/isso/js/;
  #}
}
Isso uses a straight-forward public Api, so we can easily whitelist expected requests and ignore anything else.
In this case, Isso is running from a separate domain. If you would want to serve the Api from an already existing virtual host, you’d just have to prefix the route with the path it should be reachable from.
Customize client-side
Adding comments to a site is as simple as pasting this snippet into the HTML markup.
<div id="isso-thread"></div>
<script data-isso="http://example.com/"  <!-- replace with public isso endpoint from nginx configuration -->
        data-isso-css="true" <!-- use css contained within javascript -->
        src="/js/embed.min.js" <!-- replace with public location of client-side js -->
        async crossorigin="anonymous" <!-- recommended when loading from different domain -->
></script>
The Isso client documentation has information about all possible settings, e.g. if you don’t like the default stylesheets, set data-isso-css="false" and provide your own.
All Javascript files are found in /opt/isso/lib/python3.4/site-packages/isso/js/, so you can copy them to a different server, upload to a CDN, etc. Just update the src-attribute in your HTML-snippets accordingly.
Write your own javascript
I ran into trouble with identicon generation when using strong hashing. This meant I had to make some edits.
But, instead of editing the files directly, there is a better way. Checkout the repository from github and make your own frontend:
git clone https://github.com/posativ/isso.git && cd isso && npm -g i almond jade require-js`
Installing almond, jade, and requirejs globally is necessary for making the build process to complete.
All javascript files are found in isso/js/ (relative to the project directory), so modifications can made directly in the source files. Invoking make js will bundle embed.min.js and count.min.js, which then can be used instead of the default files.
Comments are not big data
Thanks for reading to the end :) As you may have guessed, the comment system on this blog is now powered by Isso; after applying each single step outlined above.
Let’s see how the switch plays out in the long run. Self-hosting looks like an endangered concept nowadays.
Isso stores all comments in a single file on the local filesystem, so horizontal “scale” is limited. But I guess I won’t know, until after the database file has surpassed a size beyond what SQLite can handle …
Leave a comment, and let me know what you think!